Malware is intrusive or dangerous programs that...


Hi all! In this post, we’ll talk about one very real-life situation that the sister of the blog author encountered on her work computer. Its essence is that all shortcuts are opened by one program.
That is, look, for example, the Opera icon began to open through Word. In addition, as a result of this failure, the working program server installed on the PC stopped working. And this, you see, is a concrete jamb.
How could this happen? Yes, very simple. When opening a shortcut, the "Open with" command was used, causing all files with the ".lnk" extension to be assigned the wrong program to open.
But there is no great fear in this, everything can be returned to its place without much bloodshed. To do this, the author of a blog on the Internet found a simple and easy way to return the associations of shortcuts with native programs:
Let’s say right away that we will do all the manipulations using Windows 10 as an example, although on other versions of this OS everything will be similar. So, first of all, open the registry editor.
To do this, click on the "Start" button and enter the "regedit" command:

After opening it, we remember that you need to work here very carefully, without making any erroneous manipulations. At this step we need to follow the path:
Find the "UserChoice" subsection there and be sure to delete it. This is done by right-clicking on it:

That's basically all there is to it. After restarting the computer, all shortcut associations will revert to . As you can see, there is nothing complicated about this. By the way, the sister of the blog author managed to fix this problem even over the phone.
But if one of you is completely unfriendly with the registry editor or is afraid to delete something wrong there, then there is another option. It consists of running a small program on your computer called Unassociate File Types.
It is worth saying that it does not even require installation. Therefore, we take it from the link from the official website, then unpack it and launch it. But at this step the author was in for a bummer, because this utility does not work on Windows 10:

But if someone has Vista or Windows 7 installed, then there is no need to be afraid, the program will launch without problems. Then in the “File types” column we find the extension we need “.lnk” and click the “Remove file association” button:

At this point we will conclude the article, since the question of why all shortcuts are opened by one program or how to return the association of shortcuts with has been completely exhausted.
If you have any questions, hurry up and ask them in the comments. Instead, we will solve your problems and inconsistencies. And at the end, you can watch another life video.
You are faced with this situation: shortcuts on your desktop have stopped launching. It is possible that not only the shortcuts, but also the programs themselves (files with the .exe extension) do not launch. You are in a panic, not knowing what to do in such cases, you call a Master or take your computer or laptop to the Service Center, although in fact, with a little knowledge you will be able to solve not only these problems, but also many others. This is precisely what this article and, in general, the entire Site as a whole are aimed at.
So, what to do if shortcuts on the desktop do not launch.
Why shortcuts do not open or are opened by one program
This happens for many reasons - sometimes we ourselves are to blame for incorrectly setting the opening of shortcuts or executable files through this or that program. (In this case, when you try to launch a program shortcut or exe file, some completely different program may open - a browser, notepad, archiver, etc.). This may be a product of malicious software.
Our task is to fix this.
An easy way to solve the error is to search the Internet for files to fix this error. Search keywords are fix exe and fix lnk. You need to find files with the reg extension (pay attention to the Windows version in the description) and import data from them into your registry.
A description of how to solve the problem manually is BELOW.
If exe files do not start (instructions for Windows 7, Windows 8 and Windows 10)
Restoring the launch of programs on the command line. To do this, press the key combination Win + R
The Run utility will open where we write cmd and click OK.
After this it will open Command line.

In the command line, type notepad and press Enter - Notepad will launch.

Paste the text below into notepad:
Windows Registry Editor Version 5.00 [-HKEY_CURRENT_USER\Software\Microsoft\Windows\CurrentVersion\Explorer\FileExts\.exe] “exefile”=hex(0): 
Select File - Save As from the menu
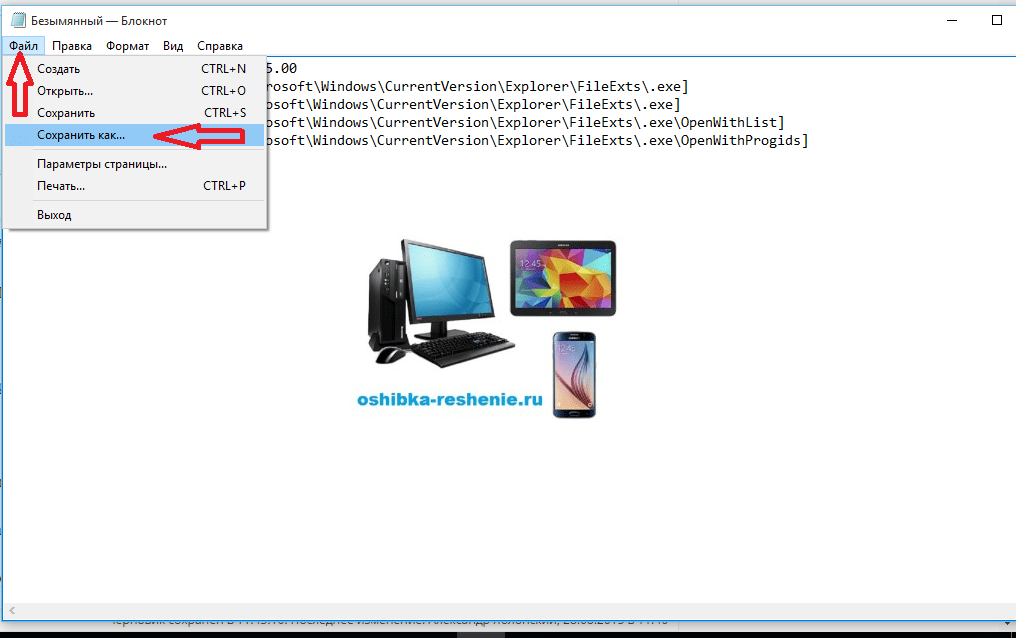
In the file type field, change the text document to “all files”.

set the encoding to Unicode.

save the file with the extension Write any name (in picture 1).reg to drive C. and click Save.

Perhaps the System will not allow you to follow this Save path, requiring Administrator Rights. Then Save to your Desktop, and then copy to Disk C.

We return to command line and enter the command: REG IMPORT C:\ saved_file_name.reg in my case REG IMPORT C:\1.reg

On Windows 10, this procedure can be performed in a different way. We move the cursor to Saved File and press the right mouse button, in the window that appears, click Merge.

We answer “Yes” to the system’s request to enter data into the registry.
Restart your computer- programs should run as before.
If this article helped you, then leave your comment and share it with your friends on Social Networks.
You are faced with this situation: shortcuts on your desktop have stopped launching. It is possible that not only the shortcuts, but also the programs themselves (files with the .exe extension) do not launch. You are in a panic, not knowing what to do in such cases, you call a Master or take your computer or laptop to the Service Center, although in fact, with a little knowledge you will be able to solve not only these problems, but also many others. This is precisely what this article and, in general, the entire Site as a whole are aimed at.
So, what to do if shortcuts on the desktop do not launch.
Why shortcuts do not open or are opened by one program
This happens for many reasons - sometimes we ourselves are to blame for incorrectly setting the opening of shortcuts or executable files through this or that program. (In this case, when you try to launch a program shortcut or exe file, some completely different program may open - a browser, notepad, archiver, etc.). This may be a product of malicious software.
Our task is to fix this.
An easy way to solve the error is to search the Internet for files to fix this error. Search keywords are fix exe and fix lnk. You need to find files with the reg extension (pay attention to the Windows version in the description) and import data from them into your registry.
A description of how to solve the problem manually is BELOW.
If exe files do not start (instructions for Windows 7, Windows 8 and Windows 10)
Restoring the launch of programs on the command line. To do this, press the key combination Win + R
The Run utility will open where we write cmd and click OK.
After this it will open Command line.
In the command line, type notepad and press Enter - Notepad will launch.
Paste the text below into notepad:
Windows Registry Editor Version 5.00 [-HKEY_CURRENT_USER\Software\Microsoft\Windows\CurrentVersion\Explorer\FileExts\.exe] “exefile”=hex(0):
Select File - Save As from the menu
In the file type field, change the text document to “all files”.
set the encoding to Unicode.
save the file with the extension Write any name (in picture 1).reg to drive C. and click Save.
Perhaps the System will not allow you to follow this Save path, requiring Administrator Rights. Then Save to your Desktop, and then copy to Disk C.
We return to command line and enter the command: REG IMPORT C:\ saved_file_name.reg in my case REG IMPORT C:\1.reg
On Windows 10, this procedure can be performed in a different way. We move the cursor to Saved File and press the right mouse button, in the window that appears, click Merge.
We answer “Yes” to the system’s request to enter data into the registry.
Restart your computer- programs should run as before.
If this article helped you, then leave your comment and share it with your friends on Social Networks.
30.09.2015
And in this article we will talk about such a common problem as why programs are not installed. Installing a program in our time is so important that there is no point in using a computer without programs. The problem of the program not installing is faced mostly by newbies in the computer field.
Also in this situation, there are those computer users who use a pirated Windows operating system.
You can also fall into such a misfortune when installing programs that you need to crack in order to use them for free.
Let's consider a number of reasons why programs are not installed:
Make sure there is a check mark next to NET Framework in the check box.


Place a check in the “run the program in compatibility mode” checkbox.

And select the operating system you need.
If the computer data is lower than the program requirement, you will wonder why programs are not installed. That's why we always read the certificate.


As you can see, there should be a “system” entry in the list of accounts


We write the system name and click check. Then go below and set the attribute to full access.

Here are all the reasons why programs are not installed. If the above methods do not help, then the problem lies with your operating system. If the operating system is licensed, then download and . If the system is pirated, then you need to reinstall the operating system - . This is where the article ends. I hope the information was useful to you. If you have any questions or something is unclear, write in the comments.

The easiest way to get the programs you need to run in a new version of the OS is to update the program version to the latest state. Software developers usually quickly respond to the emergence of the next generation of Windows and release new versions of products.
However, this method does not always work. Some programs are no longer supported by their creators, and new versions are simply not released. This often happens with products from small companies and single programmers. Often the rights to software products are bought by large companies, after which they disappear from the market.
Sometimes programs become worse after the next update and lose useful functionality. This may force users to remain on outdated versions of software and deal with compatibility issues with updated hardware and new OS versions.
The easiest way to make old programs work on Windows 7 is to use compatibility mode. To use it, just make a few clicks.
Select the program shortcut on your desktop or the exe file in the program folder. Hover your cursor over it and press the right mouse button. In the context menu that appears, click Properties and go to the Compatibility tab. Check the box next to “Run this program in compatibility mode for.” A drop-down menu will become active, in which you can select the version of the OS with which the program you need can work.
Unfortunately, this method does not always work. If selecting compatibility with previous versions of Windows does not help, you can try using other settings in the compatibility tab. For example, run the application in windowed mode, force a low resolution, or limit the color gamut. This may help some very old programs get started.
Compatibility mode can also work in automatic mode. To do this, right-click on the program shortcut and select “Fix compatibility problems” from the menu. A window will appear in which you need to select the “Program Diagnostics” item. Check the required boxes and click “Next”. Select the OS version in which the program was launched. After this, you need to click “Run program”. If it works, save the settings by selecting the appropriate item. Otherwise, refuse to save and try to change the settings.
There is also a more serious tool offered by Microsoft. This is Windows XP Mode, or XP mode. It is a virtual environment in which a full-fledged version of this operating system launches and runs. It can be run as a virtual OS, which allows you to carry out full-fledged work: install and run programs, open files, work with text. If you don't need it, you can use XP Mode as a way to open old programs in Windows 7. To start working in this mode, you just need to select the appropriate shortcut in the Start menu.
This opportunity is not available to all owners of the Microsoft OS, but only to users of the “Professional”, “Corporate” or “Maximum” versions of the “seven”. You need to download from the company's website Windows Virtual PC - a free virtual machine with which you can run XP inside Windows 7. Your computer must meet the system requirements, which you can find on the Microsoft website.


Hello. One of the most common reasons why...