In this article, we will review the capabilities of the Rufus program for creating ...


03.12.2015 from wpandr_adm
The question of how to clear system memory on android is often asked by gadget owners. Basically it is the owners of tablets. Even the owner of an ultra-modern device, soon after he manages to try out all its functions, begins to realize that charging ends very quickly, and there is a catastrophic lack of memory. Naturally, this causes certain inconveniences, there is a normal desire to increase the operating time of the gadget. Often, this simply requires clearing the memory.
One of the weakest points of any android device, be it a tablet or a smartphone, is the catastrophically fast filling of the system memory. This can be corrected with a memory card. However, if this is not possible, then you have to carefully monitor the system memory of the device.
As the practice of using a tablet shows, most of the gadget's battery charge is consumed due to the fact that many applications are running. Basically, the owner of the device does not even use them - he just opens them and forgets to close them. It would seem a banality. However, the timely completion of all processes can save battery power by almost half. Of course, this is a weighty argument in favor of keeping track of running programs on your tablet. To close active applications, you must press and hold the "Menu" button on the tablet. Icons will appear that must be closed by moving your finger to the right or left. Similar to this method is cleaning through the task manager, which is located in the Settings menu. However, it is worth knowing that such operations are not possible with respect to hidden applications.
In order not to close applications manually when the system is full of them, you can use special programs. The most popular is Clean Master. This is an Android-based device optimizer that not only cleans the system in seconds, but also performs the function of an antivirus.
The big plus of this utility is the minimal user participation in the cleaning process, and the minus is that the program closes all applications indiscriminately.
For the normal functioning of the tablet, it is necessary to have enough RAM. Open applications, as well as their abundance, do not contribute to increasing the functionality of the device, but rather slow it down. Thus, the logical solution is to free enough memory in a timely manner. This can be done in several ways.
One of the most popular is clearing the cache from the standard recovery menu. In the process of using the tablet, a lot of "garbage" accumulates, which must be periodically disposed of. To get to the menu, you need to select "Reboot to recovery" in the system settings. Then you need to reboot the device by selecting reboot.
Another effective way to increase the free space of the gadget is to transfer programs from system memory to flash media. However, this is not possible if the application is a system application and there is no card inserted in the device. It also makes sense to remove unnecessary programs. This can be done manually by selecting the appropriate operation in the "Application Management" section.
Managing free space on a tablet with an android system is not difficult. To do this, it is enough to know simple rules and periodically use them.
Cleaning the gadget from "garbage" when the system is full of it, prolongs its work at times, increasing the battery charge.
Freeing up memory on Android is not such a difficult task if done correctly. And this article is designed to teach you exactly that.
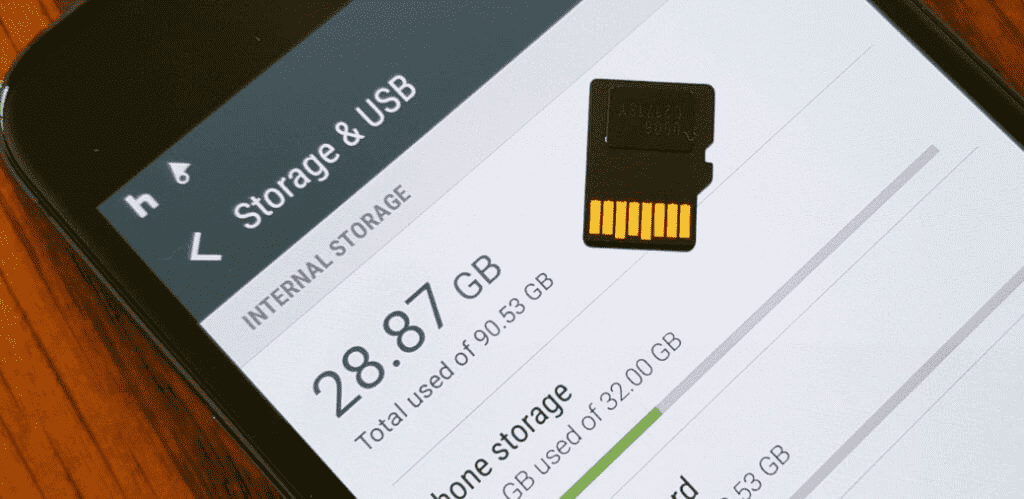
Before deleting something from the device, it is necessary to revise what is stored in the device and how much memory each element occupies. To do this, go to the “Settings” section, then “Device memory”. Here you can see detailed statistics on how much memory space is occupied by applications, pictures, audio, video downloads and other components.
By clicking on each element, you can go to the screen for managing these elements. For example, by clicking on the "Photo" section, you will be taken to your photo gallery.
Note that if you click on "clear device cache data" this will free up memory on Android, however this may slow down apps a bit as they have to fetch that cache data again. In addition, clearing the cache may cause some of your applications to have to re-enter your username and password in order to enter them.
It is also worth noting that if you manually moved music or video files to other directories, then Android will count them in the "Advanced" column.
If you have an SD card in your smartphone or tablet, then in the same section you can also view the data located on it.
Now that we have studied what our memory is clogged with, it's time to move on to freeing it.
Look at the application icons on the desktops of your devices and honestly answer yourself the question of how many of them you use regularly. Surely there are some that have not been opened for several months. It's time to remove them to free up Android memory.
If you cannot decide which of the installed applications can and should be removed, go to the settings section and select the "Applications" or "Application Manager" item. Select "Downloaded".
Here you can see a list of applications that you have downloaded in the past, as well as how much memory space they take up. This will help you make an informed decision about which applications you can safely uninstall.
Start with the apps you no longer use, take a look at the biggest space consuming apps and see if you need them. To remove an application, simply click on its name, and then on the "Delete" button.
Please note that some of the applications you will not be able to uninstall due to the fact that they are built into Android or the software of the smartphone or tablet manufacturer. But if you select the "All" tab and click on any of these applications, you will find a "Force stop" button there, then this application will no longer work and waste Android memory. In addition, you can remove updates to these applications, which will also offload the device's memory.
It also makes sense to transfer some applications to an SD card, but, unfortunately, not all Android devices support this feature. In addition, if you format the SD card, your applications on it will become inaccessible.
Review your photos in the gallery and make sure that there are no random or unnecessary ones among them. You know, photographs of the floor, ceiling and sky are of little artistic value. In addition, the desired photos can be placed on an SD card, your computer, or, finally, on one of the cloud services, such as Dropbox or Picasa.
If you have a really big music library, you don't have to keep it on your device. Services such as Google Play Music and Amazon Music can store large amounts of music files and stream them to you whenever you want.
Five feature-length movies in HD quality can take 15 or more gigabytes of memory. A dozen 1-2 minute videos you shoot will add a couple more gigabytes to this. So storing all this on your gadget is impractical.
If you purchased a movie using Google Play or Amazon, you can always find them in the cloud services of these companies. Do not forget about services where you can watch the video online, without having to download it to your tablet or smartphone.
We have already mentioned cloud services for music streaming, video and photo storage, but we will name a few more such services.
For example, Google Drive is an obvious choice for Android users, which makes it very convenient for them to work together.
Google Drive along with Google Play, Google Music and other Google services like Gmail and Google Docs gives you 15 GB of storage space to store your data.
Many Android devices have very little internal storage. On sale you can still find budget smartphones and tablets with 4 gigabytes of internal memory, of which at best 3 gigabytes is available to the user, the rest is occupied by Android itself.
Naturally, working with such an Android device is not very convenient. After all, you will be constantly to install applications and perform other tasks. In this article, we will talk about how to clear the internal memory on Android and at least partially solve this problem.
Step number 1. Transferring applications to a memory card.
It is best to start cleaning the internal memory on Android with. This procedure can be performed on any Android device with operating system version 2.2 or higher. To do this, open the settings and go to the "Application Manager" section or simply "Applications".
After that, you will see a list of all installed applications. Find the application that is taking up a lot of space on your internal memory and open it.

This will open a window with the properties of the selected application. Here you need to click on the "To SD card" button.

After pressing this button, the Android operating system will automatically transfer the application you have selected from the internal memory to the memory card. This will free up some free space in the internal memory.
It should be noted that the transfer of the application is not always possible. If the transfer button is missing or disabled, then the application is not being transferred. In this case, you need to find another application that can be transferred to a memory card.
Here you can and if you no longer use it. To do this, click on the "Delete" button, instead of the "To memory card" button.

Step #2: Remove junk with the SD maid app.
The application allows you to analyze the internal memory and SD card and find junk files left after deleting old applications.
In order to remove garbage, run this application and click on the "Update" button next to the "Garbage" item.

After that, the application will analyze the internal memory and SD card. After the analysis is completed, in the "Junk" section, information about the number of files found and their size will appear. In my case, the program found 14 files for as much as 874 megabytes (see screenshot below). In order to delete these files, you need to click on the "Clean" button, which is located at the bottom of the screen.

Step #3: Transfer user files from internal storage to MicroSD card.
The next step in clearing the internal memory is the transfer of user data. To do this, you need a good file manager. For example, you can use . Launch this file manager and go to the "Device" section (internal memory).

After that, examine the folders that are there. If you find your files (photos, music, videos, documents), then transfer them to a memory card. This can be done using the same file manager.
Particular attention should be removed to such folders as: Bluetooth, DCIM, Documents, Download, Movies, Music, Pictures, Sounds. As a rule, these folders accumulate a lot of files that can be easily transferred to a memory card.
Buying a new gadget is a joy. However, the euphoria of buying an ultra-modern tablet subsides very quickly. Literally right after the newly minted owner thoroughly studies and tries all the applications available in the device.
Meanwhile, as practice shows, a huge number of various files and programs, for the most part used by the user extremely rarely, significantly reduces the performance level of the communication device. The fact is that for the correct functioning of the gadget, it is necessary to have a certain amount of free RAM. How can memory be freed? Let's try to deal with this issue.
Another option that will help free up the gadget's memory is the standard cache clearing from the "" menu. The menu item called "wipe cache partition" makes it possible to clear the cache of garbage that remained in the device's memory after incorrect removal of applications and files. You can enter this menu in two ways: directly from the system - by selecting the "reboot to recovery" item or by simultaneously pressing the volume control and the "recovery" button when the tablet is turned off. Please note: the reset menu must be selected using the volume buttons, after which you should press "on". Next, you should reboot the device by selecting the "reboot" item.
System tools can be found in the menu by selecting "Settings - application management - specific program". In order to free up memory, you must select the item "transfer to SD card". Unnecessary program will be stored on the memory card.

A similar result - the release of internal memory can be achieved through the use of programs such as:
(transferring programs to SD);
Over time, using a mobile device, its internal memory becomes clogged, resulting in quite noticeable malfunctions. In addition, the gadget can prohibit the subsequent saving of photos, downloading additional applications. To restore functionality, you need to understand,how to clear phone memory on androide, clean up as soon as possible. Today there are several ways to solve the problem.
One of the most popular programs today is Clean Master. More than 8 million users managed to evaluate its functionality. This is an impressive figure, which confirms the justification of the choice. Figure out,how to clear memory on androidwith the help of special software is easy. You need to install and run the program. Next, you need to do the following:
open the program;
on the main page, find the "Junk" tab;
start determining the amount of free space that can be obtained;
check marked files. Perhaps you still need some of them. With such files, you must uncheck the box indicating the subsequent deletion;
start the cleaning process. Upon completion, a corresponding system notification will appear.
Figure out,how to clean android phoneusing the Clean Master program is completely simple. This is a very useful application that should not be removed from your device. It will allow you to keep your smartphone at the peak of its functionality, to do it without much difficulty.
In this article, we will review the capabilities of the Rufus program for creating ...


You hardly write "ASAP" (as soon as possible - as soon as possible) to a girlfriend, ...